


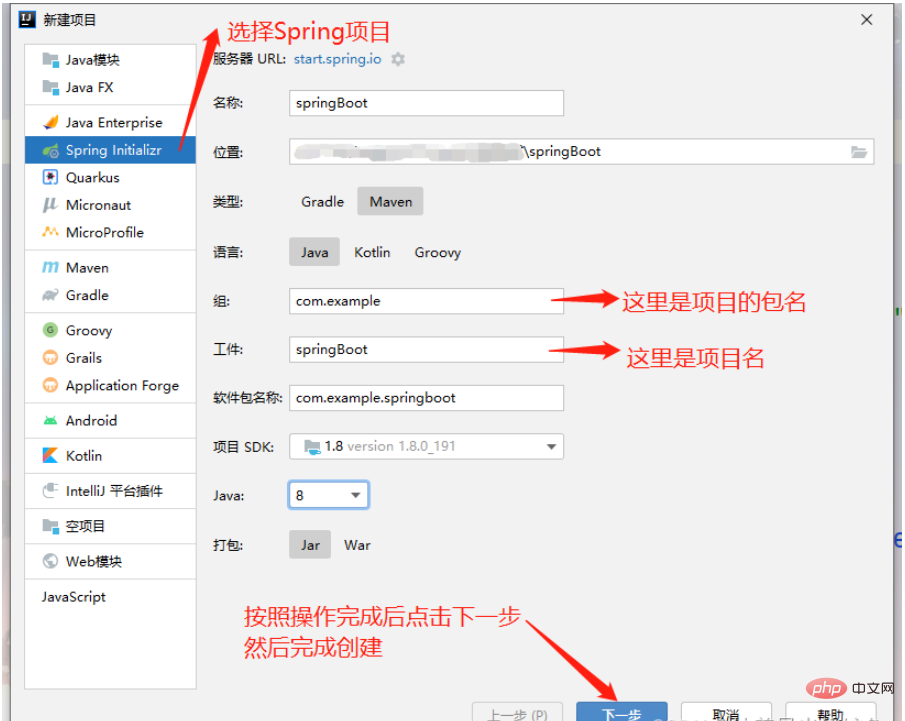
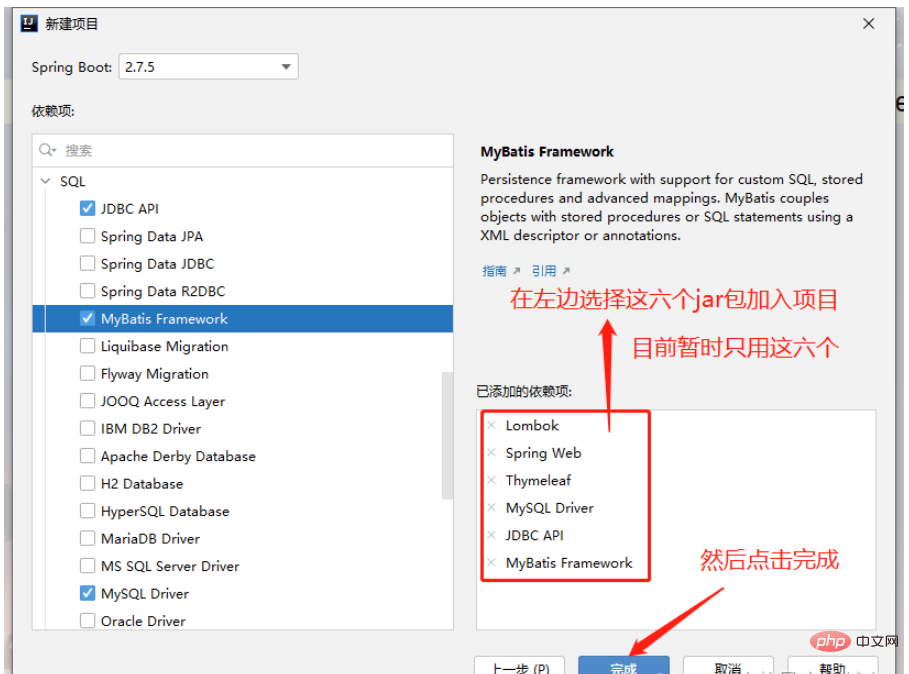
首先我们先创建项目 注意:创建springboot项目时一定要联网不然会报错
项目创建好后我们首先对 application.yml 进行编译
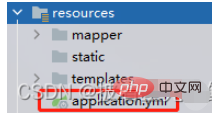
#指定端口号server: port: 8888#配置mysql数据源spring: datasource: driver-class-name: com.mysql.cj.jdbc.Driver url: jdbc:mysql://localhost:3306/nba?serverTimezone=Asia/Shanghai username: root password: root#配置模板引擎 thymeleaf thymeleaf: mode: HTML5 cache: false suffix: .html prefix: classpath:/templates/mybatis: mapper-locations: classpath:/mapper/*.xml type-aliases-package: com.bdqn.springboot #放包名
注意:在 :后一定要空格,这是他的语法,不空格就会运行报错
接下来我们进行对项目的构建 创建好如下几个包 可根据自己实际需要创建其他的工具包之类的
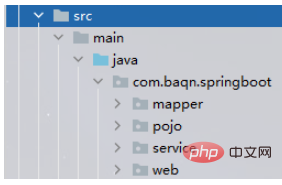
mapper:用于存放dao层接口
pojo:用于存放实体类
service:用于存放service层接口,以及service层实现类
web:用于存放controller控制层
接下来我们开始编写代码
首先是实体类,今天做的是一个两表的简单增删改查
package com.baqn.springboot.pojo;
import lombok.Data;
@Data
public class Clubs {
    private int cid;
    private String cname;
    private String city;
}
package com.baqn.springboot.pojo;
import lombok.Data;
@Data
public class Players {
private int pid;
private String pname;
private String birthday;
private int height;
private int weight;
private String position;
private int cid;
private String cname;
private String city;
}使用@Data注解可以有效减少实体类中的代码数量,缩减了对于get/set和toString的编写
然后是mapper层
package com.baqn.springboot.mapper;
import com.baqn.springboot.pojo.Players;
import org.apache.ibatis.annotations.Mapper;
import org.apache.ibatis.annotations.Param;
import org.springframework.stereotype.Repository;
import java.util.List;
@Mapper
@Repository
public interface PlayersMapper {
    /**
     * 查询所有
     * @return
     */
    List<Players> findAll();
    /**
     * 根据ID查询
     * @return
     */
    Players findById(Integer id);
    /**
     * 新增
     * @param players
     * @return
     */
    Integer add(Players players);
    /**
     * 删除
     * @param pid
     * @return
     */
    Integer delete(Integer pid);
    /**
     * 修改
     * @param players
     * @return
     */
    Integer update(Players players);
}
使用@mapper后,不需要在spring配置中设置扫描地址,通过mapper.xml里面的namespace属性对应相关的mapper类,spring将动态的生成Bean后注入到Servicelmpl中。
然后是service层
package com.baqn.springboot.service;
import com.baqn.springboot.pojo.Players;
import org.apache.ibatis.annotations.Param;
import java.util.List;
public interface PlayersService {
    List<Players> findAll();
    Players findById(Integer pid);
    Integer add(Players players);
    Integer delete(Integer pid);
    Integer update(Players players);
}
package com.baqn.springboot.service;
import com.baqn.springboot.mapper.PlayersMapper;
import com.baqn.springboot.pojo.Players;
import org.springframework.beans.factory.annotation.Autowired;
import org.springframework.stereotype.Service;
import java.util.List;
@Service
public class PlayersServiceImpl implements PlayersService{
@Autowired
private PlayersMapper mapper;
@Override
public List<Players> findAll() {
return mapper.findAll();
}
@Override
public Players findById(Integer pid) {
return mapper.findById(pid);
}
@Override
public Integer add(Players players) {
return mapper.add(players);
}
@Override
public Integer delete(Integer pid) {
return mapper.delete(pid);
}
@Override
public Integer update(Players players) {
return mapper.update(players);
}
}最后是web层的controller控制类
package com.baqn.springboot.web;
import com.baqn.springboot.pojo.Players;
import com.baqn.springboot.service.PlayersServiceImpl;
import org.springframework.beans.factory.annotation.Autowired;
import org.springframework.stereotype.Controller;
import org.springframework.ui.Model;
import org.springframework.web.bind.annotation.PathVariable;
import org.springframework.web.bind.annotation.RequestMapping;
import java.util.List;
@Controller
public class PlayersController {
    @Autowired
    private PlayersServiceImpl service;
    @RequestMapping("/findAll")
    public String findAll(Model model) {
        List<Players> allList = service.findAll();
        model.addAttribute("allList",allList);
        return "index";
    }
    @RequestMapping("/findById/{pid}")
    public String findById(Model model,@PathVariable("pid") Integer pid) {
        Players list = service.findById(pid);
        //System.out.println("---------------"+list.toString());
        model.addAttribute("list",list);
        return "update.html";
    }
    @RequestMapping("/add")
    public String add(Model model, Players players){
        Integer count = service.add(players);
        if (count>0){
            return "redirect:/findAll";
        }
        return "add";
    }
    @RequestMapping("/delete/{pid}")
    public String delete(Model model,@PathVariable("pid") Integer pid){
        Integer count = service.delete(pid);
        if (count>0){
            return "redirect:/findAll";
        }
        return null;
    }
    @RequestMapping("/a1")
    public String a1(Model model, Players players){
        return "add.html";
    }
    @RequestMapping("/update")
    public String update(Model model,Players plays){
        Integer count = service.update(plays);
        if (count>0){
            return "redirect:/findAll";
        }
        return null;
    }
}
注意:a1方法仅仅是用于跳转页面,并没有其他作用,如果有更好的跳转方法可以给我留言哦
现在准备工作都做完了,可以开始编写SQL语句了
mapper.xml可以写在下面resources里面也可以写在上面的mapper层里

如果写在上面的话需要在pom里面写一个资源过滤器,有兴趣的话可以去百度
<?xml version="1.0" encoding="UTF-8" ?>
<!DOCTYPE mapper
        PUBLIC "-//mybatis.org//DTD Mapper 3.0//EN"
        "http://mybatis.org/dtd/mybatis-3-mapper.dtd">
<!--namespace=绑定一个对应的Dao/Mapper接口-->
<mapper namespace="com.baqn.springboot.mapper.PlayersMapper">
    <select id="findAll" resultType="com.baqn.springboot.pojo.Players">
        select * from clubs c , players p
        where c.cid = p.cid
    </select>
    <select id="findById" resultType="com.baqn.springboot.pojo.Players">
        select * from clubs c , players p
        where c.cid = p.cid and p.pid=#{pid}
    </select>
    <insert id="add" parameterType="com.baqn.springboot.pojo.Players">
        INSERT INTO `nba`.`players`(pname, birthday, height, weight, position, cid)
        VALUES (#{pname}, #{birthday}, #{height}, #{weight}, #{position}, #{cid});
    </insert>
    <delete id="delete" parameterType="int">
        delete from players where pid = #{pid}
    </delete>
    <update id="update" parameterType="com.baqn.springboot.pojo.Players">
        UPDATE `nba`.`players`
        <set>
            <if test="pname != null">pname=#{pname},</if>
            <if test="birthday != null">birthday=#{birthday},</if>
            <if test="height != null">height=#{height},</if>
            <if test="weight != null">weight=#{weight},</if>
            <if test="position != null">position=#{position},</if>
            <if test="cid != null">cid=#{cid}</if>
        </set>
        WHERE `pid` = #{pid};
    </update>
</mapper>
注意:mapper.xml中的id里对应的是mapper层接口的方法,一定不能写错
到现在为止我们的后端代码就已经完全搞定了,前端页面如下
主页 index.html
<html>
<head>
    <title>Title</title>
</head>
<body>
<div align="center">
    <table border="1">
        <h2>美国职业篮球联盟(NBA)球员信息</h2>
        <a th:href="@{/a1}" rel="external nofollow" >新增</a>
        <tr>
            <th>球员编号</th>
            <th>球员名称</th>
            <th>出生时间(yyyy-MM-dd)</th>
            <th>球员身高(cm)</th>
            <th>球员体重(kg)</th>
            <th>球员位置</th>
            <th>所属球队</th>
            <th>相关操作</th>
        </tr>
        <!--/*@thymesVar id="abc" type=""*/-->
        <tr th:each="list : ${allList}">
                <td th:text="${list.pid}"></td>
                <td th:text="${list.pname}"></td>
                <td th:text="${list.birthday}"></td>
                <td th:text="${list.height}">${list.height}</td>
                <td th:text="${list.weight}"></td>
                <td th:text="${list.position}"></td>
                <td th:text="${list.cname}"></td>
                <td>
                    <a th:href="@{'/findById/'+${list.pid}}" rel="external nofollow" >修改</a>
                    <a th:href="@{'/delete/'+${list.pid}}" rel="external nofollow" >删除</a>
                </td>
            </tr>
        </c:forEach>
    </table>
</div>
</body>
</html>
新增页 add.html
<!DOCTYPE html>
<html>
      <head>
      <title>Title</title>
</head>
<body>
<div align="center">
  <h4 align="center">新增球员</h4>
  <form action="/add">
    <p>
      球员名称:
      <input name="pname" id="pname">
    </p >
    <p>
      出生日期:
      <input name="birthday" id="birthday">
    </p >
    <p>
      球员升高:
      <input name="height" id="height">
    </p >
    <p>
      球员体重:
      <input name="weight" id="weight">
    </p >
    <p>
      球员位置:
      <input type="radio"  name="position" value="控球后卫"/>控球后卫
      <input type="radio"  name="position" value="得分后卫"/>得分后卫
      <input type="radio"  name="position" value="小前锋" />小前锋
      <input type="radio"  name="position" value="大前锋" />大前锋
      <input type="radio"  name="position" value="中锋"/>中锋
    </p >
    <p>
      所属球队:
      <select name="cid">
        <option value="1">热火队</option>
        <option value="2">奇才队</option>
        <option value="3">魔术队</option>
        <option value="4">山猫队</option>
        <option value="5">老鹰队</option>
      </select>
    </p >
    <input type="submit" value="保存">
    <input type="reset" value="重置">
  </form>
</div>
</body>
</html>
修改页 update.html
<!DOCTYPE html>
<html  xmlns:th="http://www.thymeleaf.org">
<head>
  <meta charset="UTF-8">
  <title>Title</title>
</head>
<body class="container">
    <div align="center">
      <h2>修改球员信息</h2>
      <br/>
      <form action="/update" method="get" id="form2">
        <table>
          <tr>
            <td colspan="2"></td>
          </tr>
          <tr>
            <td>球员编号:</td>
            <td><input type="text" name="pid"
                                    id="pid" th:value="${list.pid}"/></td>
          </tr>
          <tr>
            <td>球员姓名:</td>
            <td><input type="text" name="pname"
                                    id="pname" th:value="${list.pname}"/></td>
          </tr>
          <tr>
            <td>出身日期:</td>
            <td><input type="text" name="birthday"
                                    id="birthday" th:value="${list.birthday}"/></td>
          </tr>
          <tr>
            <td>球员身高:</td>
            <td><input type="text" name="height"
                                    id="height" th:value="${list.height}"/></td>
          </tr>
          <tr>
            <td>球员体重:</td>
            <td><input type="text" name="weight"
                                    id="weight" th:value="${list.weight}"/></td>
          </tr>
          <tr>
            <td>球员位置:</td>
            <td><input type="text" name="position"
                                    id="position" th:value="${list.position}"/></td>
          </tr>
          <tr>
            <td>所属球队:</td>
            <td>
              <select name="cid" id="cid" th:value="${list.cid}"/>
              <option value="">--请选择球队--</option>
              <option value="1">热火队</option>
              <option value="2">奇才队</option>
              <option value="3">魔术队</option>
              <option value="4">山猫队</option>
              <option value="5">老鹰队</option>
              </select></td>
          </tr>
          <tr>
            <td colspan="2"><input type="submit" id="btn2" value="保存"/>
              <input type="reset" id="wrap-clera" value="重置"/>
              <a th:href="@{/index.html}" rel="external nofollow" ><input type="button" id="btn1" value="返回"/></a>
            </td>
          </tr>
        </table>
      </form>
    </div>
</body>
</html>
数据库创建源码 -- 注意:我用的是MySQL数据库
create table clubs(
		cid int primary key auto_increment,
		cname varchar(50) not null,
		city varchar(50) not null
)
create table players(
		pid int primary key auto_increment,
		pname varchar(50) not null,
		birthday datetime not null,
		height int not null,
		weight int not null,
		position varchar(50) not null,
		cid int not null
)
alter  table  players  add  constraint  players_cid
foreign key(cid)  references  clubs(cid);
insert into clubs values
(1,'热火队','迈阿密'),
(2,'奇才队','华盛顿'),
(3,'魔术队','奥兰多'),
(4,'山猫队','夏洛特'),
(5,'老鹰队','亚特兰大')
insert into players values
(4,'多多','1989-08-08',213,186,'前锋',1),
(5,'西西','1987-10-16',199,162,'中锋',1),
(6,'南南','1990-01-23',221,184,'后锋',1)
最后给大家看一下页面展示
在地址栏输入:http://localhost:8888/findAll 进入到查询所有方法再跳转到idnex.html进行显示
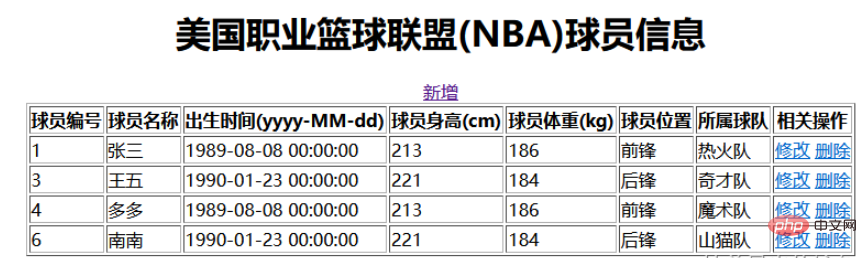
点击新增跳转到新增页面
输入参数
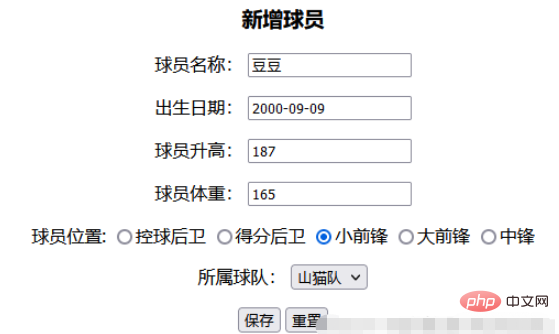
然后点击保存 添加成功后跳转到idnex.html并显示数据
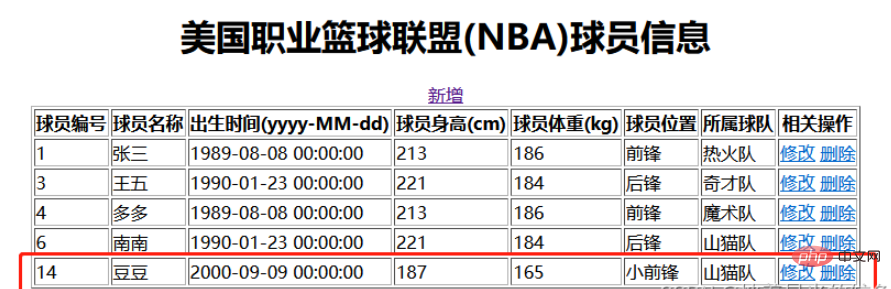
前端数据显示表面成功添加
点击修改 根据findById方法找到数据,并跳转到update.htnl页面进行显示
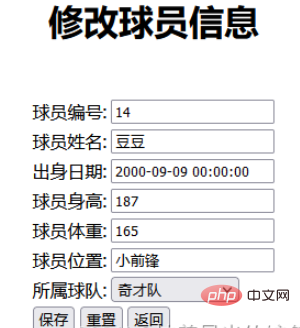
我们修改所属球队为 奇才队 点击保存
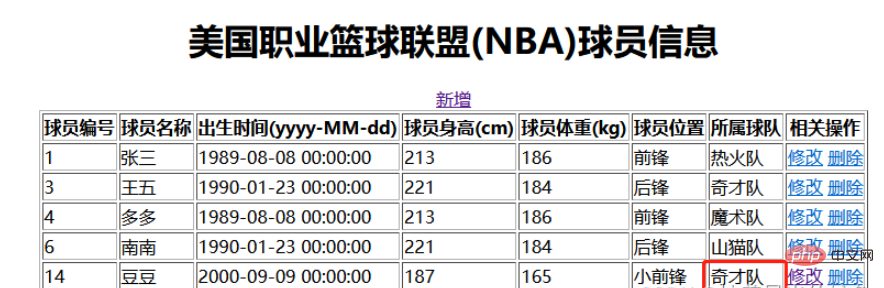
跳转到index.html页面并且数据成功修改


