


本篇文章主要介绍了一些常用的spring bean扩展接口以及它们的简单用法,具有很好的参考价值。下面跟着小编一起来看下吧
前言
Spring是一款非常强大的框架,可以说是几乎所有的企业级Java项目使用了Spring,而Bean又是Spring框架的核心。
Spring框架运用了非常多的设计模式,从整体上看,它的设计严格遵循了OCP----开闭原则,即:
1、保证对修改关闭,即外部无法修改Spring整个运作的流程
2、提供对扩展开放,即可以通过继承、实现Spring提供的众多抽象类与接口来改变类加载的行为
开卷有益,阅读Spring源码(无需每个类都看得很细,大体流程能梳理出来即可)对于个人水平的提升是帮助非常大的,同时也能在工作中即使发现和解决一些不常见的Spring问题。
不过,本文的目的不是整理Spring的流程,而是通过介绍一些常用的Spring Bean工具类,来让我们可以更好地使用Spring提供给开发者的多种特性,下面让我们开始吧。
InitialingBean和DisposableBean
InitialingBean是一个接口,提供了一个唯一的方法afterPropertiesSet()。
DisposableBean也是一个接口,提供了一个唯一的方法destory()。
这两个接口是一组的,功能类似,因此放在一起:前者顾名思义在Bean属性都设置完毕后调用afterPropertiesSet()方法做一些初始化的工作,后者在Bean生命周期结束前调用destory()方法做一些收尾工作。下面看一下例子,为了能明确地知道afterPropertiesSet()方法的调用时机,加上一个属性,给属性set方法,在set方法中打印一些内容:
/**
 * @author 五月的仓颉 http://www.cnblogs.com/xrq730/p/5721366.html
 */
public class LifecycleBean implements InitializingBean, DisposableBean
{
  @SuppressWarnings("unused")
  private String  lifeCycleBeanName;

  public void setLifeCycleBeanName(String lifeCycleBeanName)
  {
    System.out.println("Enter LifecycleBean.setLifeCycleBeanName(), lifeCycleBeanName = " + lifeCycleBeanName);
    this.lifeCycleBeanName = lifeCycleBeanName;
  }

  public void destroy() throws Exception
  {
    System.out.println("Enter LifecycleBean.destroy()");
  }

  public void afterPropertiesSet() throws Exception
  {
    System.out.println("Enter LifecycleBean.afterPropertiesSet()");
  }

  public void beanStart()
  {
    System.out.println("Enter LifecycleBean.beanStart()");
  }
  public void beanEnd()
  {
    System.out.println("Enter LifecycleBean.beanEnd()");
  }
}
配置一个spring.xml:
启动Spring容器,LifecycleBean执行的结果为:
Enter LifecycleBean.setLifeCycleBeanName(), lifeCycleBeanName = lifeCycleBean
Enter LifecycleBean.afterPropertiesSet()
Enter LifecycleBean.beanStart()
Enter LifecycleBean.destroy()
Enter LifecycleBean.beanEnd()
执行结果和我们想的一样,afterPropertiesSet()方法就如同它的名字所表示的那样,是在Bean的属性都被设置完毕之后,才会调用。
关于这两个接口,我总结几点:
1、InitializingBean接口、Disposable接口可以和init-method、destory-method配合使用,接口执行顺序优先于配置
2、InitializingBean接口、Disposable接口底层使用类型强转.方法名()进行直接方法调用,init-method、destory-method底层使用反射,前者和Spring耦合程度更高但效率高,后者解除了和Spring之间的耦合但是效率低,使用哪个看个人喜好
3、afterPropertiesSet()方法是在Bean的属性设置之后才会进行调用,某个Bean的afterPropertiesSet()方法执行完毕才会执行下一个Bean的afterPropertiesSet()方法,因此不建议在afterPropertiesSet()方法中写处理时间太长的方法
BeanNameAware、ApplicationContextAware和BeanFactoryAware
这三个接口放在一起写,是因为它们是一组的,作用相似。
"Aware"的意思是"感知到的",那么这三个接口的意思也不难理解:
1、实现BeanNameAware接口的Bean,在Bean加载的过程中可以获取到该Bean的id
2、实现ApplicationContextAware接口的Bean,在Bean加载的过程中可以获取到Spring的ApplicationContext,这个尤其重要,ApplicationContext是Spring应用上下文,从ApplicationContext中可以获取包括任意的Bean在内的大量Spring容器内容和信息
3、实现BeanFactoryAware接口的Bean,在Bean加载的过程中可以获取到加载该Bean的BeanFactory
看一下例子:
/**
 * @author 五月的仓颉 http://www.cnblogs.com/xrq730/p/5721366.html
 */
public class AwareBean implements BeanNameAware, BeanFactoryAware, ApplicationContextAware
{
  private String           beanName;

  private ApplicationContext    applicationContext;

  private BeanFactory        beanFactory;

  public void setBeanName(String beanName)
  {
    System.out.println("Enter AwareBean.setBeanName(), beanName = " + beanName + "\n");
    this.beanName = beanName;
  }

  public void setApplicationContext(ApplicationContext applicationContext) throws BeansException
  {
    System.out.println("Enter AwareBean.setApplicationContext(), applicationContext = " + applicationContext + "\n");
    this.applicationContext = applicationContext;
  }

  public void setBeanFactory(BeanFactory beanFactory) throws BeansException
  {
    System.out.println("Enter AwareBean.setBeanFactory(), beanfactory = " + beanFactory + "\n");
    this.beanFactory = beanFactory;
  }
}
配置一个Spring.xml:
启动Spring容器后的执行结果为:
Enter AwareBean.setBeanName(), beanName = AwareBean

Enter AwareBean.setBeanFactory(), beanfactory = org.springframework.beans.factory.support.DefaultListableBeanFactory@2747fda0: defining beans [AwareBean,org.springframework.context.annotation.internalConfigurationAnnotationProcessor,org.springframework.context.annotation.internalAutowiredAnnotationProcessor,org.springframework.context.annotation.internalRequiredAnnotationProcessor,org.springframework.context.annotation.internalCommonAnnotationProcessor,org.springframework.context.annotation.ConfigurationClassPostProcessor.importAwareProcessor,org.springframework.context.annotation.ConfigurationClassPostProcessor.enhancedConfigurationProcessor]; root of factory hierarchy

Enter AwareBean.setApplicationContext(), applicationContext = org.springframework.context.support.GenericApplicationContext@5514cd80: startup date [Mon Aug 08 19:23:30 CST 2016]; root of context hierarchy
关于这三个接口以及上面的打印信息,总结几点:
1、如果你的BeanName、ApplicationContext、BeanFactory有用,那么就自己定义一个变量将它们保存下来,如果没用,那么只需要实现setXXX()方法,用一下Spring注入进来的参数即可
2、如果Bean同时还实现了InitializingBean,容器会保证BeanName、ApplicationContext和BeanFactory在调用afterPropertiesSet()方法被注入
FactoryBean
FactoryBean在Spring中是非常有用的,使用Eclipse/MyEclipse的朋友可以对FactoryBean使用ctrl+t查看一下,FactoryBean这个接口在Spring容器中有大量的子实现。
传统的Spring容器加载一个Bean的整个过程,都是由Spring控制的,换句话说,开发者除了设置Bean相关属性之外,是没有太多的自主权的。FactoryBean改变了这一点,开发者可以个性化地定制自己想要实例化出来的Bean,方法就是实现FactoryBean接口。
看一下代码例子,为了讲清楚FactoryBean,内容相对多一些,首先定义一个接口Animal:
public interface Animal
{
  public void move();
}
定义两个实现类Monkey和Tiger:
public class Monkey implements Animal
{
  public void move()
  {
    System.out.println("Monkey move!");
  }
}
public class Tiger implements Animal
{
public void move()
{
System.out.println("Tiger move!");
}
}写一个实现类,实现FactoryBean接口:
/** * @author 五月的仓颉 http://www.cnblogs.com/xrq730/p/5721366.html */ public class AnimalFactoryBean implements FactoryBean{ private String animal; public Animal getObject() throws Exception { if ("Monkey".equals(animal)) { return new Monkey(); } else if ("Tiger".equals(animal)) { return new Tiger(); } else { return null; } } public Class getObjectType() { return Animal.class; } public boolean isSingleton() { return true; } public void setAnimal(String animal) { this.animal = animal; } }
配置一个spring.xml,注入属性Tiger:
写一个JUnit的测试类:
@RunWith(SpringJUnit4ClassRunner.class)
@ContextConfiguration(locations = {
    "classpath*:spring.xml",
})
public class BaseTest
{
  @Resource
  private Animal  animal;

  @Test
  public void aa()
  {
    animal.move();
  }
}
查看一下运行结果:
Tiger move!
看到最后得到的并不是FactoryBean本身,而是FactoryBean的泛型对象,这就是FactoryBean的作用。FactoryBean的几个方法:
1、getObject()方法是最重要的,控制Bean的实例化过程
2、getObjectType()方法获取接口返回的实例的class
3、isSingleton()方法获取该Bean是否为一个单例的Bean

像我这段代码的功能就是传入一个String类型的参数,可以动态控制生成出来的是接口的哪种子类。有了FactoryBean,同样的我们也可以灵活地操控Bean的生成。
BeanPostProcessor
之前的InitializingBean、DisposableBean、FactoryBean包括init-method和destory-method,针对的都是某个Bean控制其初始化的操作,而似乎没有一种办法可以针对每个Bean的生成前后做一些逻辑操作,PostProcessor则帮助我们做到了这一点,先看一个简单的BeanPostProcessor。
网上有一张图画了Bean生命周期的过程,画得挺好,原图出处:
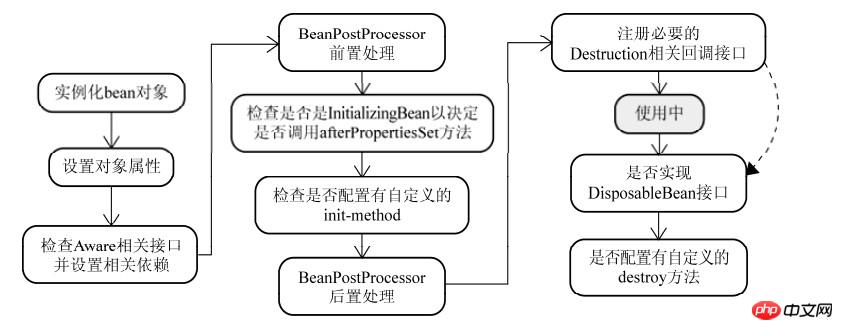
BeanPostProcess接口有两个方法,都可以见名知意:
1、postProcessBeforeInitialization:在初始化Bean之前
2、postProcessAfterInitialization:在初始化Bean之后
值得注意的是,这两个方法是有返回值的,不要返回null,否则getBean的时候拿不到对象。
写一段测试代码,首先定义一个普通的Bean,为了后面能区分,给Bean加一个属性:
public class CommonBean
{
  private String commonName;
  public void setCommonName(String commonName)
  {
    this.commonName = commonName;
  }
  public void initMethod()
  {
    System.out.println("Enter CommonBean.initMethod(), commonName = " + commonName);
  }
}
定义一个PostProcess,实现BeanPostProcess接口:
/**
 * @author 五月的仓颉 http://www.cnblogs.com/xrq730/p/5721366.html
 */
public class PostProcessorBean implements BeanPostProcessor
{
  public Object postProcessAfterInitialization(Object bean, String beanName) throws BeansException
  {
    System.out.println("Enter ProcessorBean.postProcessAfterInitialization()\n");
    return bean;
  }
  public Object postProcessBeforeInitialization(Object bean, String beanName) throws BeansException
  {
    System.out.println("Enter ProcessorBean.postProcessBeforeInitialization()");
    return bean;
  }
}
配置一个spring.xml,给CommonBean的commonName赋予不同的值以区分:
运行一个Spring容器, 初始化结果为:
Enter ProcessorBean.postProcessBeforeInitialization()
Enter CommonBean.initMethod(), commonName = common0
Enter ProcessorBean.postProcessAfterInitialization()

Enter ProcessorBean.postProcessBeforeInitialization()
Enter CommonBean.initMethod(), commonName = common1
Enter ProcessorBean.postProcessAfterInitialization()
Enter ProcessorBean.postProcessBeforeInitialization()
Enter ProcessorBean.postProcessAfterInitialization()
看到每个Bean初始化前后都会分别执行postProcessorBeforeInitiallization()方法与postProcessorAfterInitialization()方法,最后两行出现原因是,PostProcessorBean本身也是一个Bean。
BeanFactoryPostProcessor
接下来看另外一个PostProcessor----BeanFactoryPostProcessor。
Spring允许在Bean创建之前,读取Bean的元属性,并根据自己的需求对元属性进行改变,比如将Bean的scope从singleton改变为prototype,最典型的应用应当是PropertyPlaceholderConfigurer,替换xml文件中的占位符,替换为properties文件中相应的key对应的value,这将会在下篇文章中专门讲解PropertyPlaceholderConfigurer的作用及其原理。
BeanFactoryPostProcessor就可以帮助我们实现上述的功能,下面来看一下BeanFactoryPostProcessor的使用,定义一个BeanFactoryPostProcessor的实现类:
/**
 * @author 五月的仓颉 http://www.cnblogs.com/xrq730/p/5721366.html
 */
public class FactoryPostProcessorBean implements BeanFactoryPostProcessor
{
  public void postProcessBeanFactory(ConfigurableListableBeanFactory configurablelistablebeanfactory)
      throws BeansException
  {
    System.out.println("Enter FactoryPostProcessorBean.postProcessBeanFactory()\n");
  }
}
spring.xml里面配置一下这个Bean,就不写了,运行一下Spring容器,结果为:
Enter FactoryPostProcessorBean.postProcessBeanFactory()

Enter ProcessorBean.postProcessBeforeInitialization()
Enter CommonBean.initMethod(), commonName = common0
Enter ProcessorBean.postProcessAfterInitialization()

Enter ProcessorBean.postProcessBeforeInitialization()
Enter CommonBean.initMethod(), commonName = common1
Enter ProcessorBean.postProcessAfterInitialization()
Enter ProcessorBean.postProcessBeforeInitialization()
Enter ProcessorBean.postProcessAfterInitialization()
从执行结果中可以看出两点:
1、BeanFactoryPostProcessor的执行优先级高于BeanPostProcessor
2、BeanFactoryPostProcessor的postProcessBeanFactory()方法只会执行一次
注意到postProcessBeanFactory方法是带了参数ConfigurableListableBeanFactory的,这就和我之前说的可以使用BeanFactoryPostProcessor来改变Bean的属性相对应起来了。ConfigurableListableBeanFactory功能非常丰富,最基本的,它携带了每个Bean的基本信息,比如我简单写一段代码:
/**
 * @author 五月的仓颉 http://www.cnblogs.com/xrq730/p/5721366.html
 */
public void postProcessBeanFactory(ConfigurableListableBeanFactory configurablelistablebeanfactory)
      throws BeansException
{
  BeanDefinition beanDefinition = configurablelistablebeanfactory.getBeanDefinition("common0");
  MutablePropertyValues beanProperty = beanDefinition.getPropertyValues();
  System.out.println("scope before change:" + beanDefinition.getScope());
  beanDefinition.setScope("singleton");
  System.out.println("scope after change:" + beanDefinition.getScope());
  System.out.println("beanProperty:" + beanProperty);
}
看一下执行结果:
scope before change:
scope after change:singleton
beanProperty:PropertyValues: length=1; bean property 'commonName'
这样就获取了Bean的生命周期以及重新设置了Bean的生命周期。ConfigurableListableBeanFactory还有很多的功能,比如添加BeanPostProcessor,可以自己去查看。
InstantiationAwareBeanPostProcessor
最后写一个叫做InstantiationAwareBeanPostProcessor的PostProcessor。
InstantiationAwareBeanPostProcessor又代表了Spring的另外一段生命周期:实例化。先区别一下Spring Bean的实例化和初始化两个阶段的主要作用:
1、实例化----实例化的过程是一个创建Bean的过程,即调用Bean的构造函数,单例的Bean放入单例池中
2、初始化----初始化的过程是一个赋值的过程,即调用Bean的setter,设置Bean的属性
之前的BeanPostProcessor作用于过程(2)前后,现在的InstantiationAwareBeanPostProcessor则作用于过程(1)前后,看一下代码,给前面的CommonBean加上构造函数:
public class CommonBean
{
  public CommonBean()
  {
    System.out.println("Enter CommonBean's constructor");
  }

  private String commonName;

  public void setCommonName(String commonName)
  {
    System.out.println("Enter CommonBean.setCommonName(), commonName = " + commonName);
    this.commonName = commonName;
  }
  public void initMethod()
  {
    System.out.println("Enter CommonBean.initMethod(), commonName = " + commonName);
  }
}
实现InstantiationAwareBeanPostProcessor接口:
/**
 * @author 五月的仓颉 http://www.cnblogs.com/xrq730/p/5721366.html
 */
public class InstantiationAwareBeanPostProcessorBean implements InstantiationAwareBeanPostProcessor
{
  public Object postProcessAfterInitialization(Object bean, String beanName) throws BeansException
  {
    System.out.println("Enter InstantiationAwareBeanPostProcessorBean.postProcessAfterInitialization()");
    return bean;
  }

  public Object postProcessBeforeInitialization(Object bean, String beanName) throws BeansException
  {
    System.out.println("Enter InstantiationAwareBeanPostProcessorBean.postProcessBeforeInitialization()");
    return bean;
  }

  public boolean postProcessAfterInstantiation(Object bean, String beanName) throws BeansException
  {
    System.out.println("Enter InstantiationAwareBeanPostProcessorBean.postProcessAfterInstantiation()");
    return true;
  }

  public Object postProcessBeforeInstantiation(Class bean, String beanName) throws BeansException
  {
    System.out.println("Enter InstantiationAwareBeanPostProcessorBean.postProcessBeforeInstantiation()");
    return null;
  }
  public PropertyValues postProcessPropertyValues(PropertyValues pvs, PropertyDescriptor[] pd, Object bean,
      String beanName) throws BeansException
  {
    return pvs;
  }
}
配置一下spring.xml:
启动容器,观察一下运行结果为:
Enter InstantiationAwareBeanPostProcessorBean.postProcessBeforeInstantiation()
Enter CommonBean's constructor
Enter InstantiationAwareBeanPostProcessorBean.postProcessAfterInstantiation()
Enter CommonBean.setCommonName(), commonName = common
Enter InstantiationAwareBeanPostProcessorBean.postProcessBeforeInitialization()
Enter InstantiationAwareBeanPostProcessorBean.postProcessAfterInitialization()
Enter InstantiationAwareBeanPostProcessorBean.postProcessAfterInstantiation()
Enter InstantiationAwareBeanPostProcessorBean.postProcessBeforeInitialization()
Enter InstantiationAwareBeanPostProcessorBean.postProcessAfterInitialization()
最后三行的运行结果不去关注,看到很明显的,InstantiationAwareBeanPostProcessor作用的是Bean实例化前后,即:
1、Bean构造出来之前调用postProcessBeforeInstantiation()方法
2、Bean构造出来之后调用postProcessAfterInstantiation()方法
不过通常来讲,我们不会直接实现InstantiationAwareBeanPostProcessor接口,而是会采用继承InstantiationAwareBeanPostProcessorAdapter这个抽象类的方式来使用。
后记
如果只会写个Bean,配置在xml文件里面,注入一下,那是最最基础的Spring开发者。一个中级、高级的Spring开发者,必然会对Spring中的多个扩展点有所了解,并利用这些扩展点更好地为项目服务,使得整个代码结构更加地优雅,并且可读性、可维护性更好。
【相关推荐】
1. 继承0
2. 继承1
3. 继承2


