


一、前言
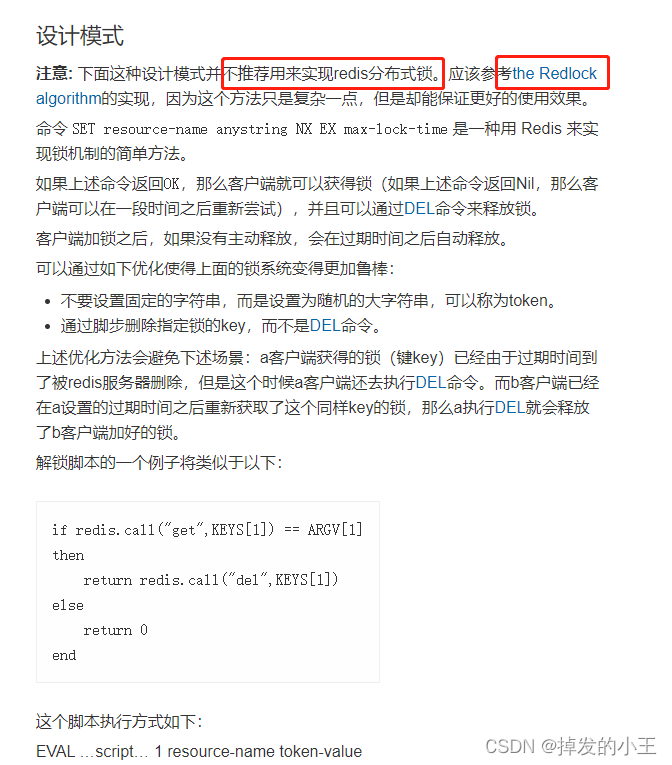
我们在实现使用redis实现分布式锁,最开始一般使用set resource-name anystring nx ex max-lock-time进行加锁,使用lua脚本保证原子性进行实现释放锁。这样手动实现比较麻烦,对此redis官网也明确说java版使用redisson来实现。小编也是看了官网慢慢的摸索清楚,特写此记录一下。从官网到整合springboot到源码解读,以单节点为例。
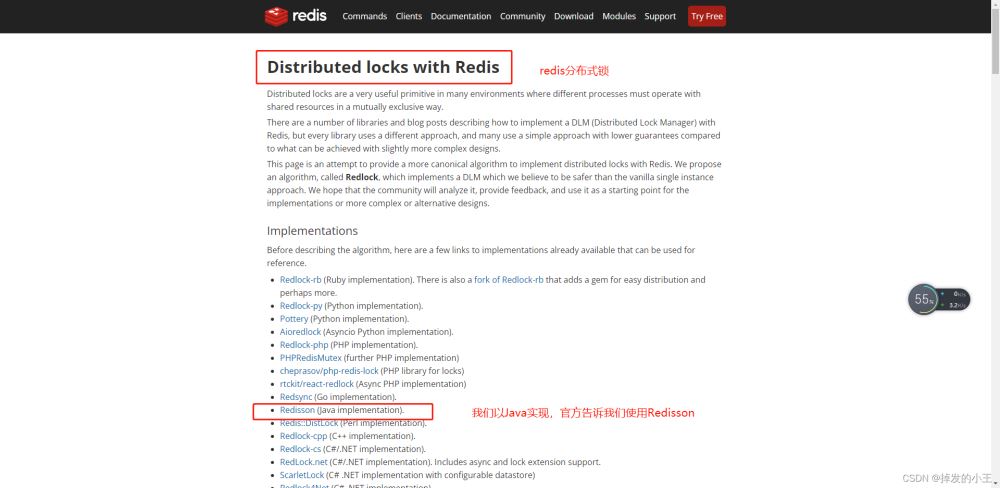
二、为什么使用Redisson
1. 我们打开官网
redis中文官网
2. 我们可以看到官方让我们去使用其他
3. 打开官方推荐
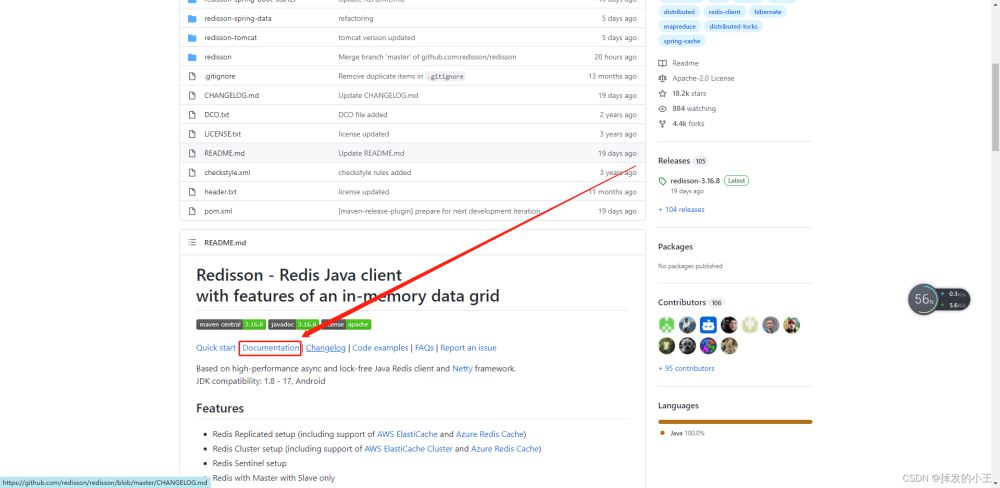
4. 找到文档
Redisson地址
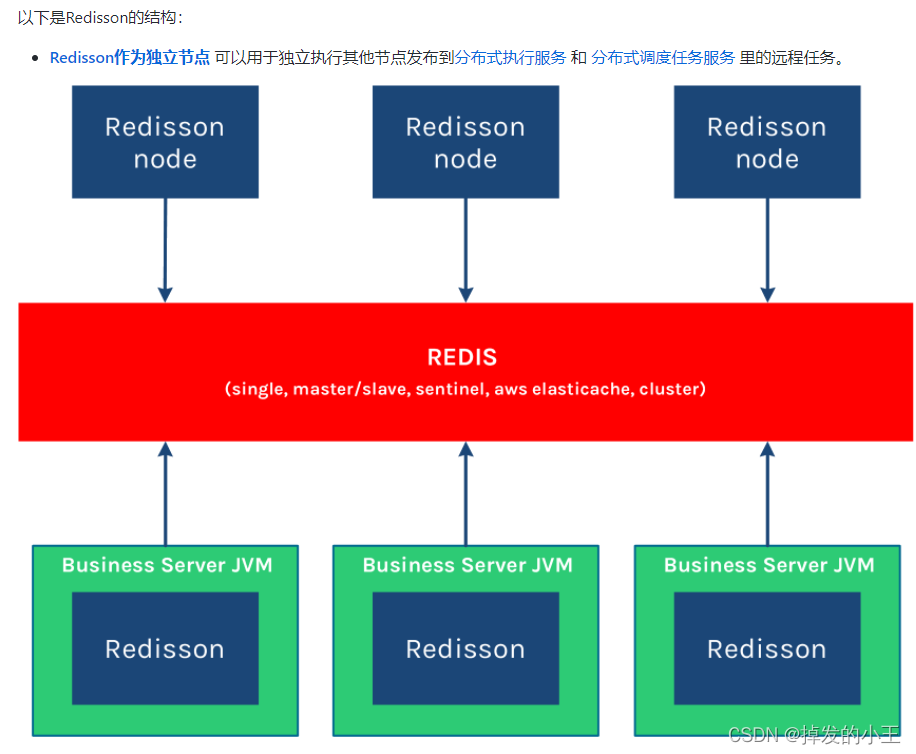
5. Redisson结构
三、Springboot整合Redisson
1. 导入依赖
<dependency>
    <groupId>org.springframework.boot</groupId>
    <artifactId>spring-boot-starter-data-redis</artifactId>
</dependency>
<dependency>
    <groupId>redis.clients</groupId>
    <artifactId>jedis</artifactId>
</dependency>
<!--redis分布式锁-->
<dependency>
    <groupId>org.redisson</groupId>
    <artifactId>redisson</artifactId>
    <version>3.12.0</version>
</dependency>
2. 以官网为例查看如何配置
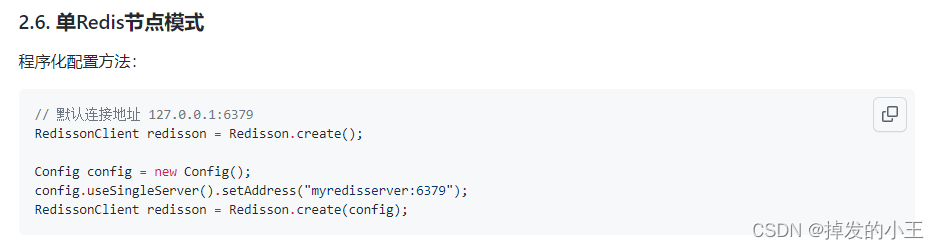
3. 编写配置类
import org.redisson.Redisson;
import org.redisson.api.RedissonClient;
import org.redisson.config.Config;
import org.springframework.context.annotation.Bean;
import org.springframework.context.annotation.Configuration;

/**
 * @author wangzhenjun
 * @date 2022/2/9 9:57
 */
@Configuration
public class MyRedissonConfig {

    /**
     * 所有对redisson的使用都是通过RedissonClient来操作的
     * @return
     */
    @Bean(destroyMethod="shutdown")
    public RedissonClient redisson(){
        // 1. 创建配置
        Config config = new Config();
        // 一定要加redis://
        config.useSingleServer().setAddress("redis://192.168.17.130:6379");
        // 2. 根据config创建出redissonClient实例
        RedissonClient redissonClient = Redisson.create(config);
        return redissonClient;
    }
}
4. 官网测试加锁例子
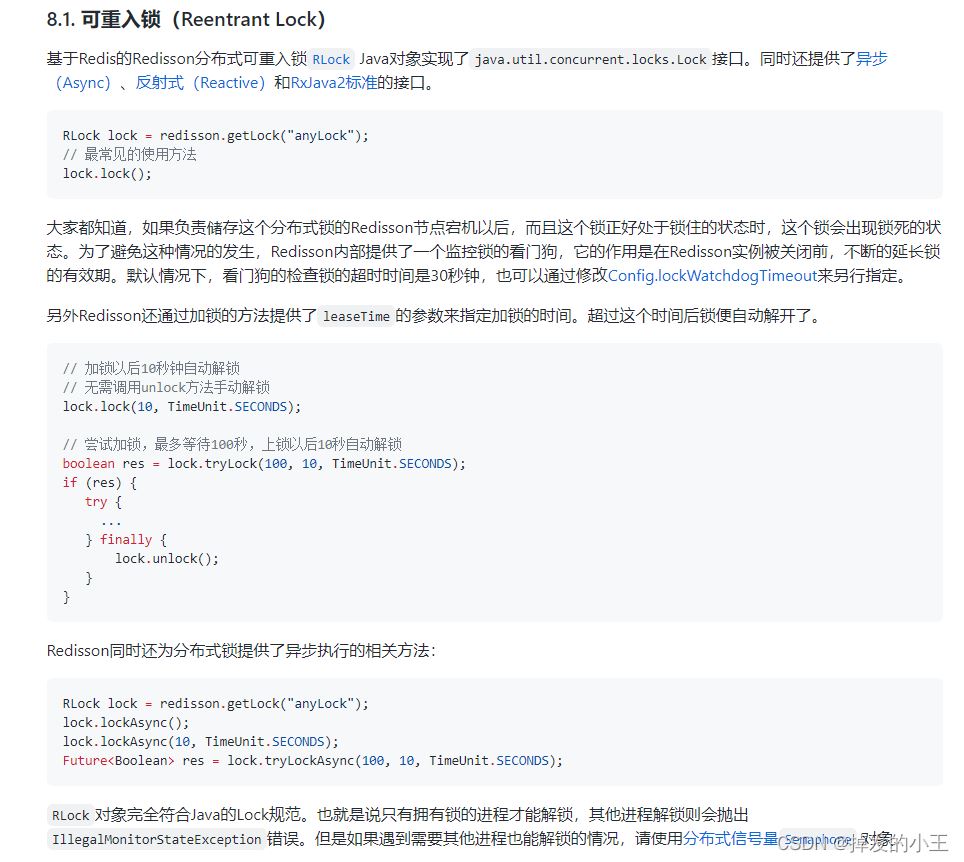
5. 根据官网简单Controller接口编写
@ResponseBody
@GetMapping("/hello")
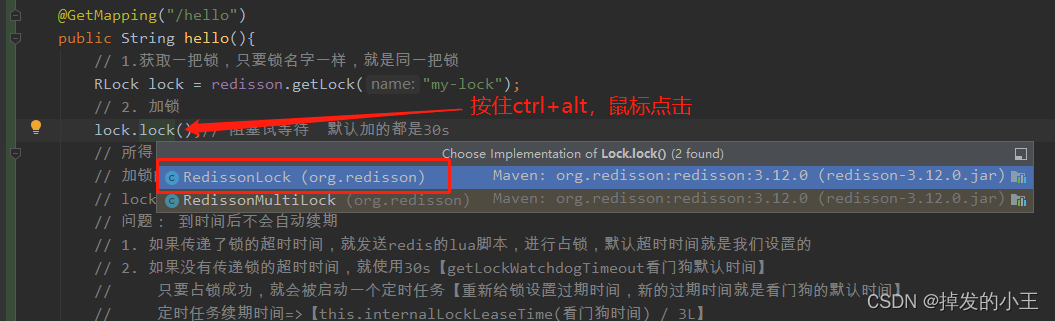
public String hello(){
// 1.获取一把锁,只要锁名字一样,就是同一把锁
RLock lock = redisson.getLock("my-lock");
// 2. 加锁
lock.lock();// 阻塞试等待 默认加的都是30s
// 带参数情况
// lock.lock(10, TimeUnit.SECONDS);// 10s自动解锁,自动解锁时间一定要大于业务的执行时间。
try {
System.out.println("加锁成功" + Thread.currentThread().getId());
Thread.sleep(30000);
} catch (InterruptedException e) {
e.printStackTrace();
} finally {
// 3. 解锁
System.out.println("解锁成功:" + Thread.currentThread().getId());
lock.unlock();
}
return "hello";
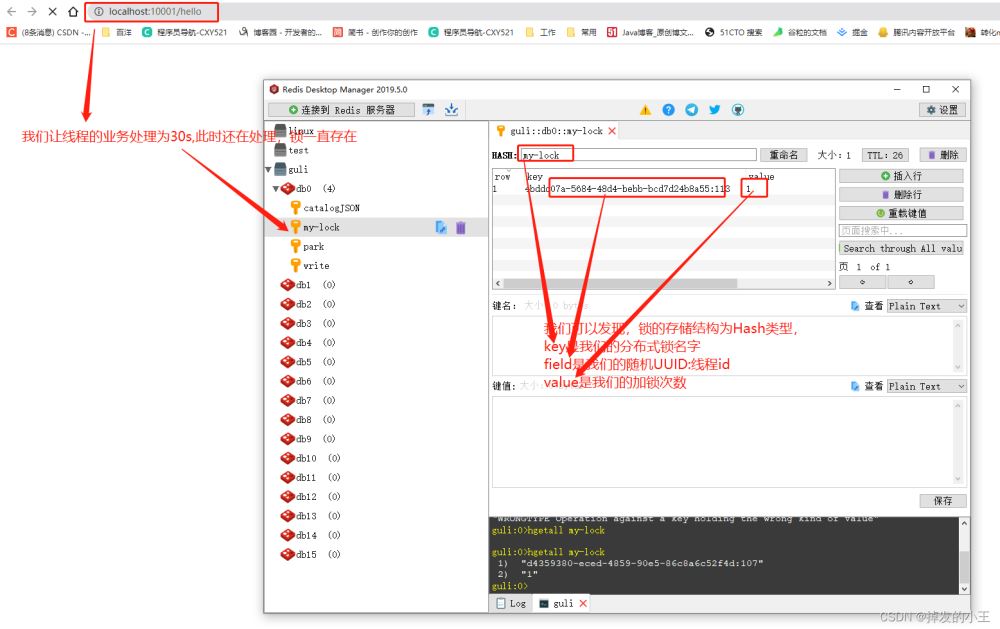
}6. 测试
四、lock.lock()源码分析
1. 打开RedissonLock实现类

2. 找到实现方法
@Override
public void lock() {
try {
// 我们发现不穿过期时间源码默认过期时间为-1
lock(-1, null, false);
} catch (InterruptedException e) {
throw new IllegalStateException();
}
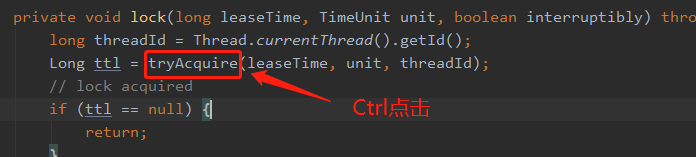
}3. 按住Ctrl进去lock方法
private void lock(long leaseTime, TimeUnit unit, boolean interruptibly) throws InterruptedException {
	// 获取线程的id,占有锁的时候field的值为UUID:线程号id
    long threadId = Thread.currentThread().getId();
    // 尝试获得锁
    Long ttl = tryAcquire(leaseTime, unit, threadId);
    // lock acquired 获得锁,返回
    if (ttl == null) {
        return;
    }
	// 这里说明获取锁失败,就通过线程id订阅这个锁
    RFuture<RedissonLockEntry> future = subscribe(threadId);
    if (interruptibly) {
        commandExecutor.syncSubscriptionInterrupted(future);
    } else {
        commandExecutor.syncSubscription(future);
    }

    try {
    	// 这里进行自旋,不断尝试获取锁
        while (true) {
        	// 继续尝试获取锁
            ttl = tryAcquire(leaseTime, unit, threadId);
            // lock acquired 获取成功
            if (ttl == null) {
            	// 直接返回,挑出自旋
                break;
            }

            // waiting for message 继续等待获得锁
            if (ttl >= 0) {
                try {
                    future.getNow().getLatch().tryAcquire(ttl, TimeUnit.MILLISECONDS);
                } catch (InterruptedException e) {
                    if (interruptibly) {
                        throw e;
                    }
                    future.getNow().getLatch().tryAcquire(ttl, TimeUnit.MILLISECONDS);
                }
            } else {
                if (interruptibly) {
                    future.getNow().getLatch().acquire();
                } else {
                    future.getNow().getLatch().acquireUninterruptibly();
                }
            }
        }
    } finally {
     	// 取消订阅
        unsubscribe(future, threadId);
    }
//        get(lockAsync(leaseTime, unit));
}
4. 进去尝试获取锁方法
private Long tryAcquire(long leaseTime, TimeUnit unit, long threadId) {
	// 直接进入异步方法
    return get(tryAcquireAsync(leaseTime, unit, threadId));
}

private <T> RFuture<Long> tryAcquireAsync(long leaseTime, TimeUnit unit, long threadId) {
    // 这里进行判断如果没有设置参数leaseTime = -1
    if (leaseTime != -1) {
        return tryLockInnerAsync(leaseTime, unit, threadId, RedisCommands.EVAL_LONG);
    }
    // 此方法进行获得锁,过期时间为看门狗的默认时间
    // private long lockWatchdogTimeout = 30 * 1000;看门狗默认过期时间为30s
    // 加锁和过期时间要保证原子性,这个方法后面肯定调用执行了Lua脚本,我们下面在看
    RFuture<Long> ttlRemainingFuture = tryLockInnerAsync(commandExecutor.getConnectionManager().getCfg().getLockWatchdogTimeout(), TimeUnit.MILLISECONDS, threadId, RedisCommands.EVAL_LONG);
    // 开启一个定时任务进行不断刷新过期时间
    ttlRemainingFuture.onComplete((ttlRemaining, e) -> {
        if (e != null) {
            return;
        }
        // lock acquired 获得锁
        if (ttlRemaining == null) {
        	// 刷新过期时间方法,我们下一步详细说一下
            scheduleExpirationRenewal(threadId);
    });
    return ttlRemainingFuture;
5. 查看tryLockInnerAsync()方法
<T> RFuture<T> tryLockInnerAsync(long leaseTime, TimeUnit unit, long threadId, RedisStrictCommand<T> command) {
    internalLockLeaseTime = unit.toMillis(leaseTime);

    return commandExecutor.evalWriteAsync(getName(), LongCodec.INSTANCE, command,
    		  // 首先判断锁是否存在
              "if (redis.call('exists', KEYS[1]) == 0) then " +
              		// 存在则获取锁
                  "redis.call('hset', KEYS[1], ARGV[2], 1); " +
                  // 然后设置过期时间
                  "redis.call('pexpire', KEYS[1], ARGV[1]); " +
                  "return nil; " +
              "end; " +
              // hexists查看哈希表的指定字段是否存在,存在锁并且是当前线程持有锁
              "if (redis.call('hexists', KEYS[1], ARGV[2]) == 1) then " +
              		// hincrby自增一
                  "redis.call('hincrby', KEYS[1], ARGV[2], 1); " +
                  	// 锁的值大于1,说明是可重入锁,重置过期时间
                  "redis.call('pexpire', KEYS[1], ARGV[1]); " +
                  "return nil; " +
              "end; " +
              // 锁已存在,且不是本线程,则返回过期时间ttl
              "return redis.call('pttl', KEYS[1]);",
                Collections.<Object>singletonList(getName()), internalLockLeaseTime, getLockName(threadId));
}
6. 进入4留下的定时任务scheduleExpirationRenewal()方法
一步步往下找源码:scheduleExpirationRenewal --->renewExpiration
根据下面源码,定时任务刷新时间为:internalLockLeaseTime / 3,是看门狗的1/3,即为10s刷新一次
private void renewExpiration() {
    ExpirationEntry ee = EXPIRATION_RENEWAL_MAP.get(getEntryName());
    if (ee == null) {
        return;
    }

    Timeout task = commandExecutor.getConnectionManager().newTimeout(new TimerTask() {
        @Override
        public void run(Timeout timeout) throws Exception {
            ExpirationEntry ent = EXPIRATION_RENEWAL_MAP.get(getEntryName());
            if (ent == null) {
                return;
            }
            Long threadId = ent.getFirstThreadId();
            if (threadId == null) {
                return;
            }

            RFuture<Boolean> future = renewExpirationAsync(threadId);
            future.onComplete((res, e) -> {
                if (e != null) {
                    log.error("Can't update lock " + getName() + " expiration", e);
                    return;
                }

                if (res) {
                    // reschedule itself
                    renewExpiration();
                }
            });
        }
    }, internalLockLeaseTime / 3, TimeUnit.MILLISECONDS);

    ee.setTimeout(task);
}
五、lock.lock(10, TimeUnit.SECONDS)源码分析
1. 打开实现类
@Override
public void lock(long leaseTime, TimeUnit unit) {
    try {
    	// 这里的过期时间为我们输入的10
        lock(leaseTime, unit, false);
    } catch (InterruptedException e) {
        throw new IllegalStateException();
    }
}
2. 方法lock()实现展示,同三.3源码
3. 直接来到尝试获得锁tryAcquireAsync()方法
private <T> RFuture<Long> tryAcquireAsync(long leaseTime, TimeUnit unit, long threadId) {
    // 这里进行判断如果没有设置参数leaseTime = -1,此时我们为10
    if (leaseTime != -1) {
    	// 来到此方法
        return tryLockInnerAsync(leaseTime, unit, threadId, RedisCommands.EVAL_LONG);
    }
    // 此处省略后面内容,前面以详细说明。。。。
}
4. 打开tryLockInnerAsync()方法
我们不难发现和没有传过期时间的方法一样,只不过leaseTime的值变了。
<T> RFuture<T> tryLockInnerAsync(long leaseTime, TimeUnit unit, long threadId, RedisStrictCommand<T> command) {
    internalLockLeaseTime = unit.toMillis(leaseTime);

    return commandExecutor.evalWriteAsync(getName(), LongCodec.INSTANCE, command,
    		  // 首先判断锁是否存在
              "if (redis.call('exists', KEYS[1]) == 0) then " +
              		// 存在则获取锁
                  "redis.call('hset', KEYS[1], ARGV[2], 1); " +
                  // 然后设置过期时间
                  "redis.call('pexpire', KEYS[1], ARGV[1]); " +
                  "return nil; " +
              "end; " +
              // hexists查看哈希表的指定字段是否存在,存在锁并且是当前线程持有锁
              "if (redis.call('hexists', KEYS[1], ARGV[2]) == 1) then " +
              		// hincrby自增一
                  "redis.call('hincrby', KEYS[1], ARGV[2], 1); " +
                  	// 锁的值大于1,说明是可重入锁,重置过期时间
                  "redis.call('pexpire', KEYS[1], ARGV[1]); " +
                  "return nil; " +
              "end; " +
              // 锁已存在,且不是本线程,则返回过期时间ttl
              "return redis.call('pttl', KEYS[1]);",
                Collections.<Object>singletonList(getName()), internalLockLeaseTime, getLockName(threadId));
}
六、lock.unlock()源码分析
1. 打开方法实现
@Override
public void unlock() {
    try {
    	// 点击进入释放锁方法
        get(unlockAsync(Thread.currentThread().getId()));
    } catch (RedisException e) {
        if (e.getCause() instanceof IllegalMonitorStateException) {
            throw (IllegalMonitorStateException) e.getCause();
        } else {
            throw e;
        }
    }

//        Future<Void> future = unlockAsync();
//        future.awaitUninterruptibly();
//        if (future.isSuccess()) {
//            return;
//        }
//        if (future.cause() instanceof IllegalMonitorStateException) {
//            throw (IllegalMonitorStateException)future.cause();
//        }
//        throw commandExecutor.convertException(future);
}
2. 打开unlockAsync()方法
@Override
public RFuture<Void> unlockAsync(long threadId) {
    RPromise<Void> result = new RedissonPromise<Void>();
    // 解锁方法,后面展开说
    RFuture<Boolean> future = unlockInnerAsync(threadId);
	// 完成
    future.onComplete((opStatus, e) -> {
        if (e != null) {
        	// 取消到期续订
            cancelExpirationRenewal(threadId);
            // 将这个未来标记为失败并通知所有人
            result.tryFailure(e);
            return;
        }
		// 状态为空,说明解锁的线程和当前锁不是同一个线程
        if (opStatus == null) {
            IllegalMonitorStateException cause = new IllegalMonitorStateException("attempt to unlock lock, not locked by current thread by node id: "
                    + id + " thread-id: " + threadId);
            result.tryFailure(cause);
            return;
        }

        cancelExpirationRenewal(threadId);
        result.trySuccess(null);
    });

    return result;
}
3. 打开unlockInnerAsync()方法
protected RFuture<Boolean> unlockInnerAsync(long threadId) {
    return commandExecutor.evalWriteAsync(getName(), LongCodec.INSTANCE, RedisCommands.EVAL_BOOLEAN,
    		// 判断释放锁的线程和已存在锁的线程是不是同一个线程,不是返回空
            "if (redis.call('hexists', KEYS[1], ARGV[3]) == 0) then " +
                "return nil;" +
            "end; " +
            // 释放锁后,加锁次数减一
            "local counter = redis.call('hincrby', KEYS[1], ARGV[3], -1); " +
            // 判断剩余数量是否大于0
            "if (counter > 0) then " +
            	// 大于0 ,则刷新过期时间
                "redis.call('pexpire', KEYS[1], ARGV[2]); " +
                "return 0; " +
            "else " +
            	// 释放锁,删除key并发布锁释放的消息
                "redis.call('del', KEYS[1]); " +
                "redis.call('publish', KEYS[2], ARGV[1]); " +
                "return 1; "+
            "end; " +
            "return nil;",
            Arrays.<Object>asList(getName(), getChannelName()), LockPubSub.UNLOCK_MESSAGE, internalLockLeaseTime, getLockName(threadId));

} 


