


1、前言
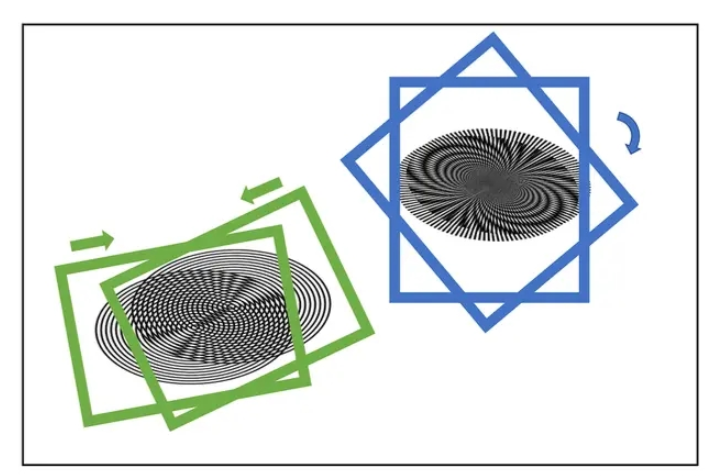
当感光元件像素的空间频率与影像中条纹的空间频率接近时,可能产生一种新的波浪形的干扰图案,即所谓的摩尔纹。传感器的网格状纹理构成了一个这样的图案。若图案中的细条状结构与传感器的结构呈小角度交叉,则会在图像中产生明显的干扰效应。这种现象在时尚摄影中布料等细密纹理情况下非常常见。这种摩尔纹可能通过亮度也可能通过颜色来展现。但是在这里,仅针对在翻拍过程中产生的图像摩尔纹进行处理。
翻拍即从计算机屏幕上捕获图片,或对着屏幕拍摄图片;该方式会在图片上产生摩尔纹现象
论文主要处理思路
-
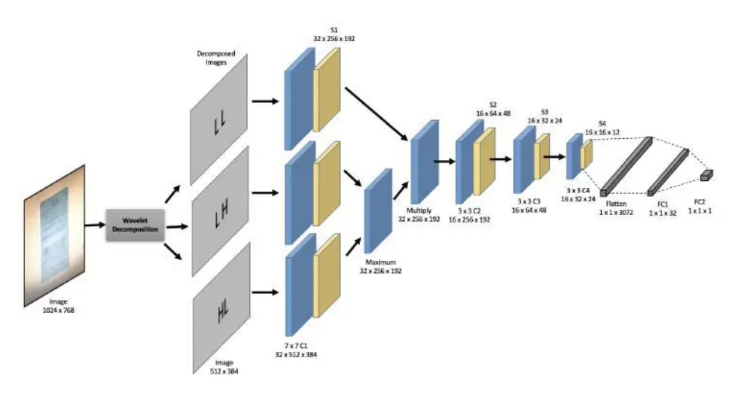
对原图作Haar变换得到四个下采样特征图(原图下二采样cA、Horizontal横向高频cH、Vertical纵向高频cV、Diagonal斜向高频cD)
立即学习“Python免费学习笔记(深入)”;
然后分别利用四个独立的CNN对四个下采样特征图卷积池化,提取特征信息
原文随后对三个高频信息卷积池化后的结果的每个channel、每个像素点比对,取max
将上一步得到的结果和cA卷积池化后的结果作笛卡尔积

论文地址
2、网络结构复现
如下图所示,本项目复现了论文的图像去摩尔纹方法,并对数据处理部分进行了修改,并且网络结构上也参考了源码中的结构,对图片产生四个下采样特征图,而不是论文中的三个,具体处理方式大家可以参考一下网络结构。
import math
import paddle
import paddle.nn as nn
import paddle.nn.functional as F
# import pywt
from paddle.nn import Linear, Dropout, ReLU
from paddle.nn import Conv2D, MaxPool2D
class mcnn(nn.Layer):
    def __init__(self, num_classes=1000):
        super(mcnn, self).__init__()
        self.num_classes = num_classes
        self._conv1_LL = Conv2D(3,32,7,stride=2,padding=1,)
        # self.bn1_LL = nn.BatchNorm2D(128)
        self._conv1_LH = Conv2D(3,32,7,stride=2,padding=1,)
        # self.bn1_LH = nn.BatchNorm2D(256)
        self._conv1_HL = Conv2D(3,32,7,stride=2,padding=1,)
        # self.bn1_HL = nn.BatchNorm2D(512)
        self._conv1_HH = Conv2D(3,32,7,stride=2,padding=1,)
        # self.bn1_HH = nn.BatchNorm2D(256)
        self.pool_1_LL = nn.MaxPool2D(kernel_size=2,stride=2, padding=0)
        self.pool_1_LH = nn.MaxPool2D(kernel_size=2,stride=2, padding=0)
        self.pool_1_HL = nn.MaxPool2D(kernel_size=2,stride=2, padding=0)
        self.pool_1_HH = nn.MaxPool2D(kernel_size=2,stride=2, padding=0)
        self._conv2 = Conv2D(32,16,3,stride=2,padding=1,)
        self.pool_2 = nn.MaxPool2D(kernel_size=2,stride=2, padding=0)
        self.dropout2 = Dropout(p=0.5)
        self._conv3 = Conv2D(16,32,3,stride=2,padding=1,)
        self.pool_3 = nn.MaxPool2D(kernel_size=2,stride=2, padding=0)
        self._conv4 = Conv2D(32,32,3,stride=2,padding=1,)
        self.pool_4 = nn.MaxPool2D(kernel_size=2,stride=2, padding=0)
        self.dropout4 = Dropout(p=0.5)
        # self.bn1_HH = nn.BatchNorm1D(256)
        self._fc1 = Linear(in_features=64,out_features=num_classes)
        self.dropout5 = Dropout(p=0.5)
        self._fc2 = Linear(in_features=2,out_features=num_classes)
    def forward(self, inputs1, inputs2, inputs3, inputs4):
        x1_LL = self._conv1_LL(inputs1)
        x1_LL = F.relu(x1_LL)
        x1_LH = self._conv1_LH(inputs2)
        x1_LH = F.relu(x1_LH)
        x1_HL = self._conv1_HL(inputs3)
        x1_HL = F.relu(x1_HL)
        x1_HH = self._conv1_HH(inputs4)
        x1_HH = F.relu(x1_HH)
        pool_x1_LL = self.pool_1_LL(x1_LL)
        pool_x1_LH = self.pool_1_LH(x1_LH)
        pool_x1_HL = self.pool_1_HL(x1_HL)
        pool_x1_HH = self.pool_1_HH(x1_HH)
        temp = paddle.maximum(pool_x1_LH, pool_x1_HL)
        avg_LH_HL_HH = paddle.maximum(temp, pool_x1_HH)
        inp_merged = paddle.multiply(pool_x1_LL, avg_LH_HL_HH)
        x2 = self._conv2(inp_merged)
        x2 = F.relu(x2)
        x2 = self.pool_2(x2)
        x2 = self.dropout2(x2)
        x3 = self._conv3(x2)
        x3 = F.relu(x3)
        x3 = self.pool_3(x3)
        x4 = self._conv4(x3)
        x4 = F.relu(x4)
        x4 = self.pool_4(x4)
        x4 = self.dropout4(x4)
        x4 = paddle.flatten(x4, start_axis=1, stop_axis=-1)
        x5 = self._fc1(x4)
        x5 = self.dropout5(x5)
        out = self._fc2(x5)
        return out
model_res = mcnn(num_classes=2)
paddle.summary(model_res,[(1,3,512,384),(1,3,512,384),(1,3,512,384),(1,3,512,384)])
---------------------------------------------------------------------------
Layer (type) Input Shape Output Shape Param #
===========================================================================
Conv2D-1 [[1, 3, 512, 384]] [1, 32, 254, 190] 4,736
Conv2D-2 [[1, 3, 512, 384]] [1, 32, 254, 190] 4,736
Conv2D-3 [[1, 3, 512, 384]] [1, 32, 254, 190] 4,736
Conv2D-4 [[1, 3, 512, 384]] [1, 32, 254, 190] 4,736
MaxPool2D-1 [[1, 32, 254, 190]] [1, 32, 127, 95] 0
MaxPool2D-2 [[1, 32, 254, 190]] [1, 32, 127, 95] 0
MaxPool2D-3 [[1, 32, 254, 190]] [1, 32, 127, 95] 0
MaxPool2D-4 [[1, 32, 254, 190]] [1, 32, 127, 95] 0
Conv2D-5 [[1, 32, 127, 95]] [1, 16, 64, 48] 4,624
MaxPool2D-5 [[1, 16, 64, 48]] [1, 16, 32, 24] 0
Dropout-1 [[1, 16, 32, 24]] [1, 16, 32, 24] 0
Conv2D-6 [[1, 16, 32, 24]] [1, 32, 16, 12] 4,640
MaxPool2D-6 [[1, 32, 16, 12]] [1, 32, 8, 6] 0
Conv2D-7 [[1, 32, 8, 6]] [1, 32, 4, 3] 9,248
MaxPool2D-7 [[1, 32, 4, 3]] [1, 32, 2, 1] 0
Dropout-2 [[1, 32, 2, 1]] [1, 32, 2, 1] 0
Linear-1 [[1, 64]] [1, 2] 130
Dropout-3 [[1, 2]] [1, 2] 0
Linear-2 [[1, 2]] [1, 2] 6
===========================================================================
Total params: 37,592
Trainable params: 37,592
Non-trainable params: 0
---------------------------------------------------------------------------
Input size (MB): 9.00
Forward/backward pass size (MB): 59.54
Params size (MB): 0.14
Estimated Total Size (MB): 68.68
---------------------------------------------------------------------------
{'total_params': 37592, 'trainable_params': 37592}3、数据预处理
与源代码不同的是,本项目将图像的小波分解部分集成在了数据读取部分,即改为了线上进行小波分解,而不是源代码中的线下进行小波分解并且保存图片。首先,定义小波分解的函数
!pip install PyWavelets
import numpy as np
import pywt
def splitFreqBands(img, levRows, levCols):
    halfRow = int(levRows/2)
    halfCol = int(levCols/2)
    LL = img[0:halfRow, 0:halfCol]
    LH = img[0:halfRow, halfCol:levCols]
    HL = img[halfRow:levRows, 0:halfCol]
    HH = img[halfRow:levRows, halfCol:levCols]
    return LL, LH, HL, HH
def haarDWT1D(data, length):
    avg0 = 0.5;
    avg1 = 0.5;
    dif0 = 0.5;
    dif1 = -0.5;
    temp = np.empty_like(data)
    # temp = temp.astype(float)
    temp = temp.astype(np.uint8)
    h = int(length/2)
    for i in range(h):
        k = i*2
        temp[i] = data[k] * avg0 + data[k + 1] * avg1;
        temp[i + h] = data[k] * dif0 + data[k + 1] * dif1;
    data[:] = temp
# computes the homography coefficients for PIL.Image.transform using point correspondences
def fwdHaarDWT2D(img):
    img = np.array(img)
    levRows = img.shape[0];
    levCols = img.shape[1];
    # img = img.astype(float)
    img = img.astype(np.uint8)
    for i in range(levRows):
        row = img[i,:]
        haarDWT1D(row, levCols)
        img[i,:] = row
    for j in range(levCols):
        col = img[:,j]
        haarDWT1D(col, levRows)
        img[:,j] = col
    return splitFreqBands(img, levRows, levCols)
!cd "data/data188843/" && unzip -q 'total_images.zip'
import os
recapture_keys = [ 'ValidationMoire']
original_keys = ['ValidationClear']
def get_image_label_from_folder_name(folder_name):
    """
    :param folder_name:
    :return:
    """
    for key in original_keys:
        if key in folder_name:
            return 'original'
    for key in recapture_keys:
        if key in folder_name:
            return 'recapture'
    return 'unclear'
label_name2label_id = {
    'original': 0,
    'recapture': 1,}
src_image_dir = "data/data188843/total_images"
dst_file = "data/data188843/total_images/train.txt"
image_folder = [file for file in os.listdir(src_image_dir)]
print(image_folder)
image_anno_list = []
for folder in image_folder:
    label_name = get_image_label_from_folder_name(folder)
    # label_id = label_name2label_id.get(label_name, 0)
    label_id = label_name2label_id[label_name]
    folder_path = os.path.join(src_image_dir, folder)
    image_file_list = [file for file in os.listdir(folder_path) if
                        file.endswith('.jpg') or file.endswith('.jpeg') or
                        file.endswith('.JPG') or file.endswith('.JPEG') or file.endswith('.png')]
    for image_file in image_file_list:
        # if need_root_dir:
        #     image_path = os.path.join(folder_path, image_file)
        # else:
        image_path = image_file
        image_anno_list.append(folder +"/"+image_path +"\t"+ str(label_id) + '\n')
dst_path = os.path.dirname(src_image_dir)
if not os.path.exists(dst_path):
    os.makedirs(dst_path)
with open(dst_file, 'w') as fd:
    fd.writelines(image_anno_list)
import paddle
import numpy as np
import pandas as pd
import PIL.Image as Image
from paddle.vision import transforms
# from haar2D import fwdHaarDWT2D
paddle.disable_static()
# 定义数据预处理
data_transforms = transforms.Compose([
transforms.Resize(size=(448,448)),
transforms.ToTensor(), # transpose操作 + (img / 255)
# transforms.Normalize( # 减均值 除标准差
# mean=[0.31169346, 0.25506335, 0.12412432463],
# std=[0.34042713, 0.29819837, 0.1375536])
#计算过程:output[channel] = (input[channel] - mean[channel]) / std[channel]
])
# 构建Dataset
class MyDataset(paddle.io.Dataset):
"""
步骤一:继承paddle.io.Dataset类
"""
def __init__(self, train_img_list, val_img_list, train_label_list, val_label_list, mode='train', ):
"""
步骤二:实现构造函数,定义数据读取方式,划分训练和测试数据集
"""
super(MyDataset, self).__init__()
self.img = []
self.label = []
# 借助pandas读csv的库
self.train_images = train_img_list
self.test_images = val_img_list
self.train_label = train_label_list
self.test_label = val_label_list
if mode == 'train':
# 读train_images的数据
for img,la in zip(self.train_images, self.train_label):
self.img.append('/home/aistudio/data/data188843/total_images/'+img)
self.label.append(paddle.to_tensor(int(la), dtype='int64'))
else:
# 读test_images的数据
for img,la in zip(self.test_images, self.test_label):
self.img.append('/home/aistudio/data/data188843/total_images/'+img)
self.label.append(paddle.to_tensor(int(la), dtype='int64'))
def load_img(self, image_path):
# 实际使用时使用Pillow相关库进行图片读取即可,这里我们对数据先做个模拟
image = Image.open(image_path).convert('RGB')
# image = data_transforms(image)
return image
def __getitem__(self, index):
"""
步骤三:实现__getitem__方法,定义指定index时如何获取数据,并返回单条数据(训练数据,对应的标签)
"""
image = self.load_img(self.img[index])
LL, LH, HL, HH = fwdHaarDWT2D(image)
label = self.label[index]
# print(LL.shape)
# print(LH.shape)
# print(HL.shape)
# print(HH.shape)
LL = data_transforms(LL)
LH = data_transforms(LH)
HL = data_transforms(HL)
HH = data_transforms(HH)
print(type(LL))
print(LL.dtype)
return LL, LH, HL, HH, np.array(label, dtype='int64')
def __len__(self):
"""
步骤四:实现__len__方法,返回数据集总数目
"""
return len(self.img)
image_file_txt = '/home/aistudio/data/data188843/total_images/train.txt'
with open(image_file_txt) as fd:
lines = fd.readlines()
train_img_list = list()
train_label_list = list()
for line in lines:
split_list = line.strip().split()
image_name, label_id = split_list
train_img_list.append(image_name)
train_label_list.append(label_id)
# print(train_img_list)
# print(train_label_list)
# 测试定义的数据集
train_dataset = MyDataset(mode='train',train_label_list=train_label_list, train_img_list=train_img_list, val_img_list=train_img_list, val_label_list=train_label_list)
# test_dataset = MyDataset(mode='test')
# 构建训练集数据加载器
train_loader = paddle.io.DataLoader(train_dataset, batch_size=2, shuffle=True)
# 构建测试集数据加载器
valid_loader = paddle.io.DataLoader(train_dataset, batch_size=2, shuffle=True)
print('=============train dataset=============')
for LL, LH, HL, HH, label in train_dataset:
print('label: {}'.format(label))
break4、模型训练
model2 = paddle.Model(model_res)
model2.prepare(optimizer=paddle.optimizer.Adam(parameters=model2.parameters()),
              loss=nn.CrossEntropyLoss(),
              metrics=paddle.metric.Accuracy())
model2.fit(train_loader,
        valid_loader,
        epochs=5,
        verbose=1,
) 


