


lambda 实验室现在推出 gh200 半价优惠,以让更多人习惯 arm 工具。这意味着您实际上可能有能力运行最大的开源模型!唯一需要注意的是,您有时必须从源代码构建一些东西。以下是我如何让 llama 405b 在 gh200s 上高精度运行。
创建实例
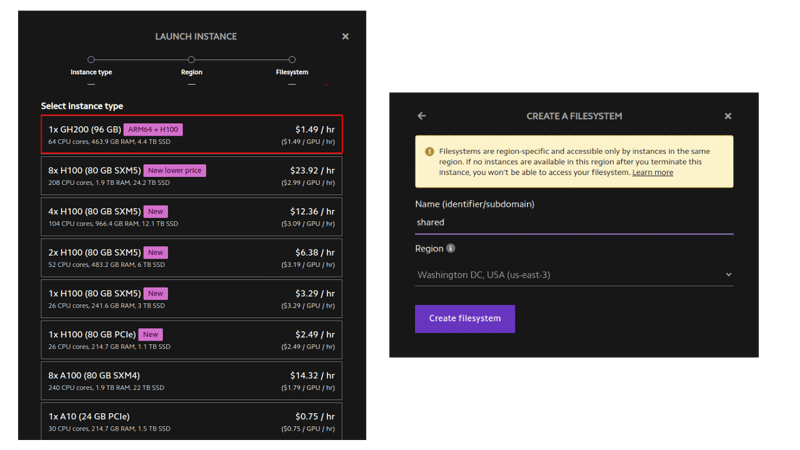
llama 405b 约为 750gb,因此您需要大约 10 个 96gb gpu 来运行它。 (gh200 具有相当好的 cpu-gpu 内存交换速度——这就是 gh200 的全部意义——所以你可以使用少至 3 个。每个令牌的时间会很糟糕,但总吞吐量是可以接受的,如果您正在执行批处理。)登录 lambda 实验室并创建一堆 gh200 实例。 确保为它们提供相同的共享网络文件系统。
将 ip 地址保存到 ~/ips.txt。
批量 ssh 连接助手
我更喜欢直接 bash 和 ssh,而不是 kubernetes 或 slurm 等任何花哨的东西。借助一些助手即可轻松管理。
# skip fingerprint confirmation
for ip in $(cat ~/ips.txt); do
    echo "doing $ip"
    ssh-keyscan $ip >> ~/.ssh/known_hosts
done

function run_ip() {
    ssh -i ~/.ssh/lambda_id_ed25519 ubuntu@$ip -- stdbuf -ol -el bash -l -c "$(printf "%q" "$*")" < /dev/null
}
function run_k() { ip=$(sed -n "$k"p ~/ips.txt) run_ip "$@"; }
function runhead() { ip="$(head -n1 ~/ips.txt)" run_ip "$@"; }

function run_ips() {
    for ip in $ips; do
        ip=$ip run_ip "$@" |& sed "s/^/$ip\t /" &
        # pids="$pids $!"
    done
    wait &> /dev/null
}
function runall() { ips="$(cat ~/ips.txt)" run_ips "$@"; }
function runrest() { ips="$(tail -n+2 ~/ips.txt)" run_ips "$@"; }

function ssh_k() {
    ip=$(sed -n "$k"p ~/ips.txt)
    ssh -i ~/.ssh/lambda_id_ed25519 ubuntu@$ip
}
alias ssh_head='k=1 ssh_k'

function killall() {
    pkill -ife '.ssh/lambda_id_ed25519'
    sleep 1
    pkill -ife -9 '.ssh/lambda_id_ed25519'
    while [[ -n "$(jobs -p)" ]]; do fg || true; done
}
设置 nfs 缓存
我们将把 python 环境和模型权重放在 nfs 中。如果我们缓存它,加载速度会快得多。
# first, check the nfs works.
# runall ln -s my_other_fs_name shared
runhead 'echo world > shared/hello'
runall cat shared/hello

# install and enable cachefilesd
runall sudo apt-get update
runall sudo apt-get install -y cachefilesd
runall "echo '
run=yes
cache_tag=mycache
cache_backend=path=/var/cache/fscache
cachefs_reclaim=0
' | sudo tee -a /etc/default/cachefilesd"
runall sudo systemctl restart cachefilesd
runall 'sudo journalctl -u cachefilesd | tail -n2'

# set the "fsc" option on the nfs mount
runhead cat /etc/fstab # should have mount to ~/shared
runall cp /etc/fstab etc-fstab-bak.txt
runall sudo sed -i 's/,proto=tcp,/,proto=tcp,fsc,/g' /etc/fstab
runall cat /etc/fstab

# remount
runall sudo umount /home/ubuntu/wash2
runall sudo mount /home/ubuntu/wash2
runall cat /proc/fs/nfsfs/volumes # fsc column should say "yes"

# test cache speedup
runhead dd if=/dev/urandom of=shared/bigfile bs=1m count=8192
runall dd if=shared/bigfile of=/dev/null bs=1m # first one takes 8 seconds
runall dd if=shared/bigfile of=/dev/null bs=1m # seond takes 0.6 seconds
创建conda环境
我们可以在 nfs 中使用 conda 环境,并只用头节点来控制它,而不是在每台机器上小心地执行完全相同的命令。
# we'll also use a shared script instead of changing ~/.profile directly.
# easier to fix mistakes that way.
runhead 'echo ". /opt/miniconda/etc/profile.d/conda.sh" >> shared/common.sh'
runall 'echo "source /home/ubuntu/shared/common.sh" >> ~/.profile'
runall which conda

# create the environment
runhead 'conda create --prefix ~/shared/311 -y python=3.11'
runhead '~/shared/311/bin/python --version' # double-check that it is executable
runhead 'echo "conda activate ~/shared/311" >> shared/common.sh'
runall which python
安装阿芙罗狄蒂依赖项
aphrodite 是 vllm 的一个分支,启动速度更快,并且有一些额外的功能。
它将运行兼容 openai 的推理 api 和模型本身。
你需要手电筒、triton 和闪光注意。
您可以从 pytorch.org 获取 aarch64 torch 构建(您不想自己构建它)。
另外两个你可以自己搭建或者使用我做的轮子。
如果您从源代码构建,那么您可以通过在三台不同的机器上并行运行 triton、flash-attention 和 aphrodite 的 python setup.py bdist_wheel 来节省一些时间。或者您可以在同一台机器上逐一执行它们。

runhead pip install 'numpy<2' torch==2.4.0 --index-url 'https://download.pytorch.org/whl/cu124124'

# fix for "libstdc++.so.6: version `glibcxx_3.4.30' not found" error:
runhead conda install -y -c conda-forge libstdcxx-ng=12

runhead python -c 'import torch; print(torch.tensor(2).cuda() + 2, "torch ok")'
来自车轮的 triton 和闪光注意
runhead pip install 'https://github.com/qpwo/lambda-gh200-llama-405b-tutorial/releases/download/v0.1/triton-3.2.0+git755d4164-cp311-cp311-linux_aarch64.whl'
runhead pip install 'https://github.com/qpwo/lambda-gh200-llama-405b-tutorial/releases/download/v0.1/aphrodite_flash_attn-2.6.1.post2-cp311-cp311-linux_aarch64.whl'
海卫一从源头
k=1 ssh_k # ssh into first machine

pip install -u pip setuptools wheel ninja cmake setuptools_scm
git config --global feature.manyfiles true # faster clones
git clone https://github.com/triton-lang/triton.git ~/shared/triton
cd ~/shared/triton/python
git checkout 755d4164 # <-- optional, tested versions
# note that ninja already parallelizes everything to the extent possible,
# so no sense trying to change the cmake flags or anything.
python setup.py bdist_wheel
pip install --no-deps dist/*.whl # good idea to download this too for later
python -c 'import triton; print("triton ok")'
来自源头的闪光注意力
k=2 ssh_k # go into second machine

git clone https://github.com/alpindale/flash-attention  ~/shared/flash-attention
cd ~/shared/flash-attention
python setup.py bdist_wheel
pip install --no-deps dist/*.whl
python -c 'import aphrodite_flash_attn; import aphrodite_flash_attn_2_cuda; print("flash attn ok")'
安装阿芙罗狄蒂
你可以使用我的轮子或自己建造。
轮子上的阿佛洛狄忒
runhead pip install 'https://github.com/qpwo/lambda-gh200-llama-405b-tutorial/releases/download/v0.1/aphrodite_engine-0.6.4.post1-cp311-cp311-linux_aarch64.whl'
阿佛洛狄忒的来源
k=3 ssh_k # building this on the third machine

git clone https://github.com/pygmalionai/aphrodite-engine.git ~/shared/aphrodite-engine
cd ~/shared/aphrodite-engine
pip install protobuf==3.20.2 ninja msgspec coloredlogs portalocker pytimeparse  -r requirements-common.txt
python setup.py bdist_wheel
pip install --no-deps dist/*.whl
检查所有安装是否成功
function runallpyc() { runall "python -c $(printf %q "$*")"; }
runallpyc 'import torch; print(torch.tensor(5).cuda() + 1, "torch ok")'
runallpyc 'import triton; print("triton ok")'
runallpyc 'import aphrodite_flash_attn; import aphrodite_flash_attn_2_cuda; print("flash attn ok")'
runallpyc 'import aphrodite; print("aphrodite ok")'
runall 'aphrodite run --help | head -n1'
下载权重
转到https://huggingface.co/meta-llama/llama-3.1-405b-instruct并确保您拥有正确的权限。批准通常需要大约一个小时。从https://huggingface.co/settings/tokens
获取令牌
pip install hf_transfer 'huggingface_hub[hf_transfer]'

runall git config --global credential.helper store
runall huggingface-cli login --token $new_hf

# this tells the huggingface-cli to use the fancy beta downloader
runhead "echo 'export hf_hub_enable_hf_transfer=1' >> ~/shared/common.sh"
runall 'echo $hf_hub_enable_hf_transfer'

runall pkill -ife huggingface-cli # kill any stragglers

# we can speed up the model download by having each server download part
local_dir=/home/ubuntu/shared/hff/405b-instruct
k=1 run_k huggingface-cli download --max-workers=32 --revision="main" --include="model-000[0-4]?-of-00191.safetensors" --local-dir=$local_dir meta-llama/meta-llama-3.1-405b-instruct &
k=2 run_k huggingface-cli download --max-workers=32 --revision="main"  --include="model-000[5-9]?-of-00191.safetensors" --local-dir=$local_dir meta-llama/meta-llama-3.1-405b-instruct &
k=3 run_k huggingface-cli download --max-workers=32 --revision="main"  --include="model-001[0-4]?-of-00191.safetensors" --local-dir=$local_dir meta-llama/meta-llama-3.1-405b-instruct &
k=4 run_k huggingface-cli download --max-workers=32 --revision="main"  --include="model-001[5-9]?-of-00191.safetensors" --local-dir=$local_dir meta-llama/meta-llama-3.1-405b-instruct &

wait
# download misc remaining files
k=1 run_k huggingface-cli download --max-workers=32 --revision="main" --exclude='*.pth' --local-dir=$local_dir meta-llama/meta-llama-3.1-405b-instruct
奔跑骆驼 405b
我们将通过启动 ray 让服务器相互了解。
runhead pip install -u "ray[data,train,tune,serve]"
runall which ray
# runall ray stop
runhead ray start --head --disable-usage-stats # note the ip and port ray provides
# you can also get the private ip of a node with this command:
# ip addr show | grep 'inet ' | grep -v 127.0.0.1 | awk '{print $2}' | cut -d/ -f1 | head -n 1
runrest ray start --address=?.?.?.?:6379
runhead ray status # should see 0.0/10.0 gpu (or however many you set up)
我们可以在一个终端选项卡中启动阿芙罗狄蒂:
# ray provides a dashboard (similar to nvidia-smi) at http://localhost:8265
# 2242 has the aphrodite api.
ssh -l 8265:localhost:8265 -l 2242:localhost:2242 ubuntu@$(head -n1 ~/ips.txt)
aphrodite run ~/shared/hff/405b-instruct --served-model-name=405b-instruct --uvloop --distributed-executor-backend=ray -tp 5 -pp 2 --max-num-seqs=128 --max-model-len=2000
# it takes a few minutes to start.
# it's ready when it prints "chat api: http://localhost:2242/v1/chat/completions"
并在第二个终端中从本地计算机运行查询:
pip install openai
python -c '
import time
from openai import openai
client = openai(api_key="empty", base_url="http://localhost:2242/v1")

started = time.time()
num_tok = 0
for part in client.completions.create(
    model="405b-instruct",
    prompt="live free or die. that is",
    temperature=0.7,
    n=1,
    max_tokens=200,
    stream=true,
):
    text = part.choices[0].text or ""
    print(text, end="", flush=true)
    num_tok += 1
elapsed = time.time() - started
print()
print(f"{num_tok=} {elapsed=:.2} tokens_per_sec={num_tok / elapsed:.1f}")
'
 THE LIFE FOR ME."
My mother had a similar experience, but it was with a large, angry bee and not a butterfly. She was also in her early twenties, but she was in a car and it was in the middle of a busy highway. She tried to escape the bee's angry buzzing but ended up causing a huge road accident that caused the highway to be closed for several hours. Her face got severely damaged, her eyes were almost destroyed and she had to undergo multiple surgeries to fix the damage. Her face never looked the same after the incident. She was lucky to have survived such a traumatic experience.
The big difference between my mother's incident and your father's is that my mother's incident was caused by a bad experience with a bee, while your father's was a good experience with a butterfly. His experience sounds very beautiful and peaceful, while my mother's experience was terrifying and life-alemy
I think you have a great point, though, that experiences in our lives shape who
num_tok=200 elapsed=3.8e+01 tokens_per_sec=5.2
对于文本来说速度不错,但是对于代码来说有点慢。如果您连接 2 台 8xh100 服务器,那么每秒会接近 16 个令牌,但成本是原来的三倍。
进一步阅读
- 理论上,您可以使用 lambda labs api 编写实例创建和销毁脚本https://cloud.lambdalabs.com/api/v1/docs
- 阿佛洛狄忒文档https://aphrodite.pygmalion.chat/
- vllm 文档(api 大部分相同)https://docs.vllm.ai/en/latest/


